| W i n d d o w s 2
|
|
|
|---|---|---|
| Tips from Microsoft | ||
Enable IP Forwarding Between Subnets
Submitted by Berry Schreuder,
e-office, Utrecht, The Netherlands
Here is my tip for Windows 2000 Server. I found out about this while I was evaluating Windows 2000 Server in a test lab.
Suppose you are testing site replication and wish to have multiple Internet Protocol (IP) subnets without having to install routers or Routing and Remote Access Services.
Here's a quick trick to enable IP forwarding:
In the Registry, set the value IPEnableRouter in HKEY_LOCAL_MACHINE\SYSTEM\CurrentControlSet\
Services\Tcpip\Parameters to 0x00000001.
This enables routing between the two subnets. Consider, though, that this is not safe when routing between public networks. Remember to set your default gateways!
Recovery Console Tips for System Admins
Submitted by Kartik Raghavan,
Program Manager for Setup, Windows 2000 Development Team
The Recovery Console allows system administrators to access the file system of a Windows 2000 computer — even if the hard disk is formatted using NTFS — by using the Windows 2000 Setup CD. This allows support professionals to fix even a non-booting Windows 2000 system. Since the Recovery Console has batch support, it is even possible for system administrators to create batch files to fix common scenarios and distribute those batch files for users to run on their systems.
It's a good idea to install Recovery Console on all of your Windows 2000 Server computers, as well as Windows 2000 Professional computers that are more at risk, such as those used by developers, software testers, or fearless power users.
To install the Recovery Console on your system:
winnt32 /cmdcons
To install the Recovery Console unattended (you can script this as part of a
setup):
winnt32 /cmdcons /unattend
Cool use of the Recovery Console:
Fix the Master Boot Record (MBR) in case it was corrupted by a virus or another
problem. Previously, this might have involved using DOS FDISK (fdisk /mbr). The
command: fixmbr.
Other cool stuff you can do:
Create a batch file for recovery commands to automate common recovery
tasks:
For example, you can automate the disabling of several services (e.g., Telnet,
Server, Telephony, Messenger) simultaneously, or automate replacement of the
registry. The command: batch<nameofbatchfile> <file to contain
output of batchfile>
One limitation is that a batch file cannot contain another batch file. This is a
really neat scenario for an IT manager: having batch files that solve common
problems that may require a lot of steps.
Enable all paths for the Recovery Console:
Use the Security & Configuration Analysis Snap-in or the Group Policy Editor
to enable the SET Command. This allows you to copy files to removable media and
gives you access to all paths.
You can also enable Auto-Logon for the Console, using the Group Policy or the
Security Configuration and Analysis MMC snap-in.
Partition and format a disk:
Use the diskpart and the format commands to partition and format a
disk NTFS, FAT, or FAT32. Incidentally, this can be scripted. See the Recovery
Console Help.
Expand a file out of the driver.cab:
Since the Windows 2000 driver files are in a .cab file, you can use the
console's Expand command to view and extract a file out of a CAB.
For more on the Recovery Console, see our Ask the Dev Team column, When Things Go Awry.
Control Size of the Bitmap Cache
Submitted by the Windows 2000 development team
The Terminal Services client for Windows 2000 includes a feature to cache bitmaps to the client hard disk. This speeds up the client display by loading previously viewed screen components from the local hard disk, rather than pulling the data from the Terminal Server.
To control the size of the bitmap cache on the client computer, you can edit this registry path:
HKEY_CURRENT_USER\Software\Microsoft\Terminal Server Client\Default
DWORD Value: BitmapCacheSize
The preferred method for making this change is to use TSReg.exe from the Windows 2000 Resource Kit.
Rescue and Repair It with the Recovery Console
Submitted by David Gallant,
CAD Resource Centre, Scarborough, Ontario, Canada
This morning I was asked by a client to check out some older software in Windows 98. I did not have that OS installed on my computer. Before thinking about it, I just started installing the software, forgetting that Windows 98 would rewrite my boot record for my system partition, and leave out the option to boot in Windows 2000.
After testing the software, I attempted to get back to Windows 2000. I quickly realized that I would have to use a rescue disk to get back. So I inserted the four Setup disks. I got a surprise when I came to the Repair section.
We now have a new tool called the Recovery Console. This works like a smaller version of a MS-DOS console, with a set of commands to run. These commands will help fix most common problems, including fixing the boot record. My problem was solved and I didn't have to go through the pain of the rescue procedure.
Thanks.
Editors' notes: The Recovery Console works with Windows 2000 Server or Professional. If running the latter, be sure to consult the Windows 2000 Professional Getting Started online book.
There are two ways to start the Recovery Console:
- If you are unable to start your computer, you can run the Recovery Console from your Windows 2000 Setup disks, as David Gallant did, or from the Windows 2000 Professional CD (if you can start your computer from your CD drive).
- You can install the Recovery Console on your computer to make it available in case you are unable to restart Windows 2000. You can then select the Recovery Console option from the list of available operating systems.
For more on the Recovery Console, see our Ask the Dev Team column, When Things Go Awry.
Use Automatic Caching To Make Files Available Offline
Submitted by the Windows 2000 Development Team
When configuring shared folders on Windows 2000 Server, you can ensure that the shared files are available for users even when they are disconnected from the network.
On computers running Windows 2000, caching is allowed and, by default, configured for Manual Caching for Documents for shared folders. This allows users to manually specify any files they want available when working offline.
To ensure that files a user opens or creates are automatically downloaded and made available offline, change the Caching setting for the shared folder to Automatic Caching for Documents. If you want the files in a shared folder to be downloaded automatically, but also want to prevent changes the user makes offline from being synchronized, use the Automatic Caching for Programs setting instead.
To change the Caching Settings for a shared folder:
- Right-click the shared folder. On the Sharing tab, click Caching.
- In the Caching Settings dialog box, click the down arrow next to the Setting box.
- In the list, click the caching setting you want.
- Click OK to return to the Properties dialog box for the folder, then click OK to apply your changes.
List of F1-F9 Key Commands for the Command Prompt
Submitted by Rodolfo De La Torre Vazquez,
Lithium Systems, Guadalajara, Mexico
F1: Repeats the letters of the last command line, one by one
F2: Displays a dialog asking user to "enter the char to copy up to" of the last command line
F3: Repeats the last command line
F4: Displays a dialog asking user to "enter the char to delete up to" of the last command line
F5: Goes back one command line
F6: Enters the traditional CTRL+Z (^z)
F7: Displays a menu with the command line history
F8: Cycles back through previous command lines (beginning with most recent)
F9: Displays a dialog asking user to enter a command number, where 0 is for first command line entered
Note: The buffer allows a maximum of 50 command lines. After this number is reached, the first line will be replaced in sequence.
Works on Professional, and Server as well.
Use Address Bar as a Command Line
Submitted by Christopher Zacharias,
Rochester, New York
Need instant access to a command line without the fuss of clicking your way to the Start Menu's Run command?
Right-click on the taskbar and add the Address bar to it. At first glance, it appears you have a simple Web address entry for Internet Explorer. However, as Internet Explorer is highly integrated with Windows 2000, you can access pretty much anything with it. This means that you can type in a command or a file and it will execute or open it. Hence, the Address bar can be used quite effectively as a command line.
This tip works with both Windows 2000 Professional and Windows 2000 Server. The Address bar, obviously, accepts Web addresses and search queries as well.
Telnet Tip
Submitted by Rodney Gordon,
Eagle Point, Oregon
Go to start/run then type in "telnet" for Windows 2000's built in telnet client! It is pretty nice because it now does ANSI terminal emulation, which is very neat for administering remote systems that you need to telnet into. In a text-editing application like Notepad, select and copy the phrase as you would normally. Next, move your mouse to the Command Prompt screen. Right-click on the desired location in this screen and the copied text will appear.
This tip works with Windows 2000 Server and Professional.
Cut and Paste in the Command Prompt
Submitted by Janwillem Borleffs,
Leiden, Netherlands
Using cut-and-paste in the Command Prompt is easy. In a text-editing application like Notepad, select and copy the phrase as you would normally. Next, move your mouse to the Command Prompt screen. Right-click on the desired location in this screen and the copied text will appear.
Naturally, you can also cut and paste in the Command Prompt screen itself. Select a phrase by moving the mouse over it while you hold down the left mouse button. Then right-click twice to paste the selection at the cursor's position.
This tip works with Windows 2000 Server and Professional.
Who Controls Protocol? Meet IPCONFIG
Submitted by Joe Snow,
Fresno, California
Having problems with TCP/IP (Transmission Control Protocol/Internet Protocol)?
If you can't find your normal WinIPcfg.exe file that you relied upon in Windows 98, it would be very helpful to know that in Windows 2000 the file is now called IPconfig.exe, and it isn't based on a GUI anymore. Run it from the command prompt and you'll have all of your TCP/IP network info.
Editors' note: IPCONFIG is a very handy utility. For usage information, type "IPCONFIG /?" at a command prompt. This tip works on Windows 2000 Server and Professional.
Customize the Start Menu
Submitted by Paul Rich,
Renton, Washington
Don't like the "compressed" menu feature of the Windows 2000 Start button? Do you like having all of the Control Panel functions available on the Start menu? This tip works on Windows 2000 Server and Professional.
- Click Start, then Settings, then Task Bar and Start Menu to open the Taskbar property sheet.
- Select the Start Menu Options tab.
- Now you can choose from a variety of check-box options, including Expand Control Panel, Expand Network and Dial-Up Connections and Use Personalized Menus. Clearing that last one will turn off those "compressed" menus, by the way.
Editors' note: The above applies to Beta 3 of Windows 2000 Server and Professional. For Release Candidate 1, tab names have changed. To turn off the "compressed" menu feature if running RC1, follow the directions above until the Taskbar property sheet is open, then click the General tab and clear the Use Personalized Menus checkbox.
Activate Network Monitor Icon
Submitted by Michael Rivett,
Dublin, Ohio
Be sure to check out the Network Monitor icon. This nifty feature is not always activated by default.
To activate the icon and its "lights":
- On the desktop, right-click My Network Places, then choose Properties. The Network and Dial-up Connections window will open. Double-click Local Area Connection.
- Click Properties. Select the check box at the bottom that says, "Show icon in taskbar when connected."
After setting this, you will have an icon in your taskbar with a great set of lights that show network activity! It's a great way to tell if your network is transferring any data.
This tip works for Windows 2000 Professional and Windows 2000 Server.
Bonus Tips (from the editors):
Bonus 1: Place the cursor over the Network Monitor icon to display a pop-up window that gives you data on the current status of your connection, including speed and packets sent and received. Right-click the icon to display a full Status window or to disconnect the network connection.
Bonus 2: You can also navigate to the Network and Dial-up Connection Properties window from the Start menu:
- Point to Settings, then point to Network and Dial-up Connections
- Click Local Area Connection or Wide Area Connection
- Click the Properties button
Defrag Hard Disk to Boost Performance
Submitted by: Clinton Davis,
Fresno, California
If you're upgrading from Windows 98, and Windows 2000 is running really sluggish, try defragging your hard drive. Worked like a charm for me.
Use Indexing Service
Submitted by Ryan J. Magyar,
Pennsylvania State University, McKeesport Campus
This tip applies to both Microsoft Windows 2000 Server and Windows 2000 Professional:
Enabling Indexing Service greatly speeds up searches by maintaining an index of the files and folders on your computer. This is especially useful if you do a lot of searching for files or folders.
To enable it, click the Start button on the taskbar, click Search, and choose For Files or Folders. Then click Search Options (below the Search Now button), and click the Indexing Service hyperlink at the bottom of the Search Options box field to open the Indexing Service window.
Happy searching!
Cable modems and Windows 2000 Server
Submitted by Duane Urban,
Starway Enterprises L.C., Dracut, Massachusetts
Our company has a small local area network (LAN), and was running a single server with Microsoft Windows NT 4.0, Service Pack 5, which we just updated to Windows 2000 Server. The machine is a custom 233P MMX™ with 128MB RAM, 66MHz bus speed and is running almost every service an IT manager could desire, including Microsoft Internet Information Server 4.0, for one of our company Websites. It is also used as a workstation while in server mode. We are connected to the Internet via an always-on cable modem, a 3Com® 10/100 3C90X-family network interface card (NIC) and Dynamic Host Configuration Protocol (DHCP) client.
For some reason, 3Com didn't anticipate this machine running Windows 2000, and as a result did not make their Dynamic Access® software compatible. Needless to say, once the update was complete neither the LAN nor the internet connection were configured properly.
The easiest way we found to get back online and get our LAN working was to uninstall the third-party network configuration software, uninstall both NICs using the Uninstall Hardware Wizard in Windows 2000, restart, and let the Found New Hardware Wizard do the rest. Once done, all the protocols and services needed for connecting to the internet and LAN were automatically installed. The only thing we had to do was add our users and reassign permissions.
Also, if you had problems getting an SB AWE 64 Gold card installed properly with Windows NT 4.0, that isn't a problem with Windows 2000.
Shortcut for locking the console
Submitted by Scott Schnoll,
Portland, Oregon
You can lock the console without having to use CTRL+ALT+DEL or a screensaver.
To do so, create a shortcut to "rundll32.exe user32.dll,LockWorkStation" (without the quotes). Then, launch the shortcut to lock the console.
I believe this can be used on both Windows 2000 Server and Professional. (Editor's note: You are correct, sir!)
Use Export List with Administrative Tools
Submitted by James Sun,
American Technology Services, Inc., Falls Church, Virginia
I use this tip constantly on Windows 2000 Server. Haven't tried it on Windows 2000 Professional, but I assume it works. (Editor's note: Sure does.)
The Export List command on all the major Administrative Tools that use Microsoft Management Console windows (e.g., Internet Services Manager, Computer Management, Event Viewer) is a tremendous timesaver.
How many times have you needed to generate a list of users in a particular group for a status report, or needed to export a list of events displayed on the screen to a spreadsheet?
Well, by using the Export List command, you can create a comma-delimited or tab-delimited, plain or Unicode, text list of items displayed on the right list-view pane in the Microsoft Management Console. One other great feature is the ability to customize the columns that are displayed on the list-view pane via the Choose Columns command.
Use IPCONFIG to update DNS entries
Submitted by John Parrish,
Totally Connected, Inc., DeLand, Florida
Something I found useful to know and that will avoid a reboot:
When working with Windows 2000 Server and external DNS entry changes, you may notice that Windows 2000 does not see the change if you have previously resolved the domain name. This happens because the server will cache DNS information so that the lookups are faster for any future requests that are made. The quick fix for this was to reboot the server.
However, the correct way to solve this problem is to use the features of ipconfig. By typing ipconfig /displaydns at the command prompt (append |more for a step-through list), you can view a list of DNS entries Windows has cached. The command ipconfig /registerdns will refresh all of the entries in the resolver cache. The entries will be updated and the server should reflect the appropriate updates. You can also dump all of the cache by typing the command ipconfig /flushdns.
It is worth noting that the entries should have a TTL, which would eventually expire. However, for frequent DNS changes this info is very helpful.
Thank you for producing great products that help us produce great products!
Use Run As to start administrative tools while logged on as a user
Submitted by Ryan Calafato, Program Manager, Microsoft
Have you ever been working while logged on with your regular user account, and had to close down all of your applications and windows to perform an administrative task? The Windows 2000 Secondary Logon service lets you run commands "as" the user, instead of having to log on as that user.
The following works for shortcuts to all administrative tools and most application shortcuts on the Start menu:
- Select the application icon using a single left-click, hold down the SHIFT
key and right-click the icon.
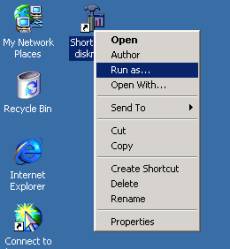
- Click Run as... This will bring up a dialog box titled, "Run
program as other user."
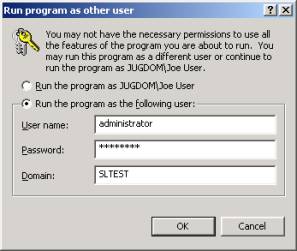
- Type the user name, password, and domain of the user you want to run this application as in the appropriate fields, then click OK.
The application is now running in the security context of the user name you specified. If you specified administrator logon credentials, you may perform administrative tasks with the application.